For the first several years of my style blog, my husband took all my photos. We worked together in our flower shop, in a downtown historic district with lots of great places to shoot, so it was easy to pop out for 5-10 minutes each day to snap photos of my outfits with our Canon Rebel DSLR camera. I imported all the photos to my Macbook, picked my favorites in iPhoto, edited them in Photoshop, and uploaded them to WordPress for every outfit post.
When C started a new full-time job in 2013 and I took on all the daily operations of our small business, I had to get creative to keep the the blog going with much less time and no in-house photographer. Through some trial and error, I figured out how to take my own decent outfit photos with my iPhone and two affordable accessories:
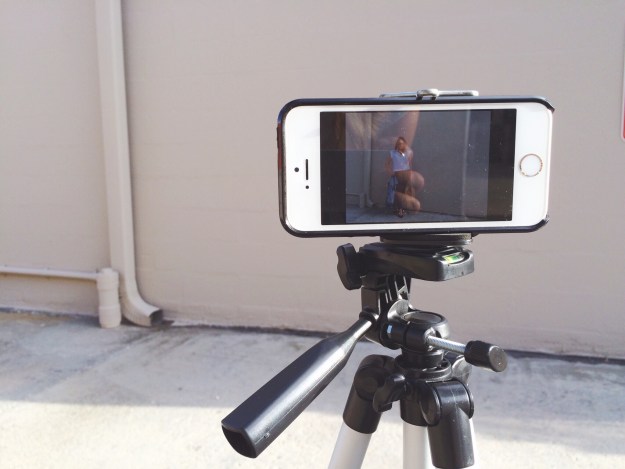
- A portable camera tripod with a smartphone mount. (Because propping your phone against a ledge just isn’t ideal.) I started with a JOBY Gorillapod Flexible Tripod
but found that an inexpensive extendable aluminum tripod is more convenient and easier to use on-the-go. I bought an aluminum camera tripod with a universal smartphone mount
for $15.59 from Amazon and use it all the time; I keep it folded in my car so I always have it on hand when I want to do an OOTD post.
- A bluetooth camera shutter remote. This small handheld device is a game changer if you want to take your own outfit photos: it connects to your phone’s camera shutter via bluetooth, and snaps a photo at the push of a button. I like the Muku Shuttr – Selfie Remote / Camera Shutter
: it works at up to 30 feet from your phone, fits nicely in the palm of your hand, and feels more durable than cheaper models I tried (and broke).
1. The Setup
The best photos are taken in natural light, so I try to squeeze in time to take outfit photos in the morning or in that lovely “golden hour” after work. I avoid shooting in places with harsh direct sunlight; shade helps minimize unflattering shadows and blown-out/unfocused shots.
Standing in front of a tripod and snapping photos of yourself can feel all kinds of awkward, so I have a few go-to quiet places near the shop where I can spend a few uninterrupted minutes moving around and snapping lots of photos. If I feel rushed or uncomfortable, it’s all over my face in photos; which is why sometimes I just post a headless shot and call it a day.
I like to use big neutral/light-colored walls as backgrounds. I set up my phone on the tripod about 8-10 feet away from my background, open the camera app, and think about what kind of composition I want so I know where to put myself in front the camera.

Tip: spend some time looking through style photos on Pinterest for composition and posing inspiration, and turn on the grid in your camera settings for extra composition help.
For full-length shots when I’m farthest away from the camera, I find a focal point — like a spot on a wall or a mark on the ground — and press and hold that spot on the screen until the focus square flickers and the “AE/AF lock” indicator appears. (This tells the camera where to focus and how much light to let in the lens so my photos are always sharp and focused with consistent lighting.)
I stand in front of that focal point and shoot, shoot, shoot while slowly shifting positions. If I hear a delay in the shutter release when I click the remote, I know I’m probably out of focus; I take a second to check things out before I keep snapping and adjust as necessary. For detail shots, I skip the AE/AF step, stand closer to the tripod, and center myself in front of the lens as I shoot. I’m not too worried about the perfect composition for these shots, because I can tweak it in the editing stage with some strategic cropping.
Tip: Don’t give in to the temptation to use the front-facing (or “selfie”) camera to see what you’re doing; it has a lower resolution and the small lens causes lots of distortion. You’ll get higher-quality shots with the back lens. With some practice, you’ll get comfortable with your favorite compositions and poses and you can knock out an outfit photo shoot in 5 minutes or less.
2. The Selection
I like to take a lot of photos in a short amount of time so I have plenty of options for a post. When I finish shooting, I quickly scroll through the photos in my camera roll, delete the terrible ones — about 75% of everything I shot — and mark the best poses/angles as favorites. When I get to the end, I go back through the favorites and narrow them down to the best 4-5 shots to use in a blog post. I delete all the leftovers from my camera roll; it saves on storage space and makes it easy to find and open the “chosen” photos in other apps.
3. The Edit
My current favorite photo editing apps for blog photos are PicTapGo and A Color Story. Both apps let you build and save custom “recipes” with your favorite photo tweaks, color adjustments and filters, which helps you create a cohesive look for all your blog (and Instagram) photos. Once your recipes are set, you can apply them to your photos with one tap for quick editing, which is a huge time-saver.
The left photo is unedited straight from my camera roll, and the right photo was lightened and brightened with one of my saved presets in A Color Story. I apply the same preset on every photo for the post and, fini!


Now that I’m used to on-the-go DIY photography for the style portion of my blog, I can knock out outfit photos in about 15 minutes, from shooting to editing to uploading (which I also do from my iPhone now). I’m happy I found a way to keep this fun creative hobby going as the flower shop grows and demands the majority of my time and energy, even if I do look like a total weirdo to passerby while I do it. ;)
What do you think?